Thursday, 9 April 2009

Viola


Violas are primarily cool season bloomers. They are perfect for starting and ending the season in colder climates and for bridging the seasons in warmer zones, where they can remain in bloom throughout the winter. So when to plant violas will depends on your climate.
Starting Violas from Seed Indoors - Violas are easy to start from seed. In fact they are quite happy to self-seed all over your garden. But if you would like to start your own indoors, the process is very straight forward.
Start seed about 4 - 6 weeks before transplanting. Violas can withstand some freezing temperatures, so cold climate gardeners can pick a transplant date that is about 4 weeks before your last expected frost date. Warm climate gardeners transplanting in the fall should start their seeds in mid-summer.
Use a sterile potting mix.
Moisten the mix and fill your flats or pots to about 1/4 inch below the top edge.
Sprinkle 2-3 seeds in each cell or pot and cover lightly with more moistened potting mix. Note: Violas need darkness to germinate, so cover the seeds completely.
Set in a warm (65 -70 degrees F. / 18 - 21 degrees C.) location and keep moist. On top of the refrigerator is a good spot. Seeds should begin to germinate in 10 - 14 days.
Once the seeds sprout, move them to a sunny window or place under plant lights.
When the first true leaves appear, thin the pot or cell to the strongest looking seeding by pinching or cutting the others at the soil line.
At this point, a temperature of 55 - 60 degrees F. / 13 - 15 degrees C. is fine. You can also begin feeding your seedlings with any good balanced, water soluble fertilizer.
Moving Your Viola Seedling Outdoors - When temperatures and weather permit transplanting outdoors, let the seedlings get adjusted to the change by hardening them off.
Move the seedling to a shaded or protected location outdoors.
Leave them outdoors for about 4 hours the first day and increase the time outside by 1-2 hours each day, slowly moving them into brighter light. The seedlings will tell you if they are unhappy by their appearance.
Make sure the soil stays moist. Outdoor winds can dry pots quickly.
Seedlings can be transplanted into the garden or containers after about 10 - 14 days of hardening. Just be sure the weather isn’t taking a down turn. Violas can withstand some frost, but not a late season snow storm.
Direct-seeding Violas into the Garden - Weather permitting, you can start viola seed directly in the garden.
Good well-draining soil with organic matter is recommended.
Loosen the soil in the planting area and moisten.
Sprinkle the viola seed.
Cover with about 1/4 soil and water well.
Keep the seed bed moist.
As seedlings develop, thin plants to about 6- 8 inches apart. Transplant excess seedlings.
Purchasing Bedding Viola Plants - Violas are often the first seedlings for sale in nurseries in spring in colder climates and at the end of the summer in warm areas.
Look for healthy plants with lots of buds. Don’t be overly tempted by plants already in flower. They won’t transplant as easily and you’ll have a longer season of bloom if the plants are only in bud when purchased.
Remove the viola plants from their cell packs by pushing up on the bottom of the container. Don’t grab the violas by their delicate stems.
Gently loosen the soil around the roots and plant in the ground at the same level as they were in their cell pack.
Spacing: Mounding violas should be spaced about 6-8 inches apart. Trailing or spreading varieties can be planted 10-12 inches apart.
Days to Bloom: Violas begin blooming about 12-14 weeks after planting seeds. V. tricolor varieties bloom about two weeks earlier than V. cornuta. ‘Penny’ and ‘Sorbet’ will bloom 9-10 weeks from sowing.
Here are some suggestons for selecting , using and caring for violas in your garden designs and containers.

Caring for Violas in the Garden
Soil: Violas grow best in rich, moist, well-drained soil with plenty of organic matter. Use a slow-release fertilizer into the soil if planting in a container.
Water: Water regularly, but allow to dry out between waterings.
Sun: Violas like full sun, but not the heat it brings. This isn’t a problem in cool spring temperatures , but when planting in the fall, make sure they get some shade during the hottest part of the afternoon. Mulch and water will help offset the stress of high temperature.
Maintenance:
To promote blooming and extend the flowering period, remove or deadhead faded flowers by pinching off the blooms at the base of the flower stem.
You can revive leggy or overgrown plants by cutting them back to about 3-4 inches tall.
Insects and Diseases: Violas are easy to grow, with few disease or insect problems.
Powdery Mildew and Botrytis (Gray Mold) - Don’t let your plants sit in cool, wet conditions. Make sure your violas get plenty of sunshine and have good air circulation.
Aphids - Wash off with a strong stream of water, or, for severe problems, treat with an insecticidal soap.
sourced from:

Lavender


Undeterred by the fact that it is a native of the Mediterranean and a lover of dry, sunny, rocky habitats, we give it a try anyway, hoping it will adapt. After all, England can hardly be considered dry or particularly sunny, yet English gardeners are renowned for their lavender plants. Think of ‘Hidcote’ and ‘Munstead’, two of the hardiest and best loved lavender varieties. This is a good place to start a discussion on growing lavender.
Growing Requirements As with most plants, your success in growing this coveted plant will depend both on what kind of growing conditions you can provide and which varieties you select to grow. Lavender plants will tolerate many growing conditions, but it thrives in warm, well-drained soil and full sun. Like many plants grown for their essential oils, a lean soil will encourage a higher concentration of oils. An alkaline and especially chalky soil will enhance lavenders fragrance. While you can grow lavender in Zone 5, it is unlikely you will ever have a lavender hedge. More realistically you can expect to have plants that will do well when the weather cooperates and to experience the occasional loss of a plant or two after a severe winter or a wet, humid summer.
Lavender is a tough plant and is extremely drought resistant, once established. However, when first starting you lavender plants, don't be afraid to give them a handful of compost in the planting hole and to keep them regularly watered during their first growing season.
Special Considerations It is dampness, more than cold, that is responsible for killing lavender plants. Dampness can come in the form of wet roots during the winter months or high humidity in the summer. If humidity is a problem, make sure you have plenty of space between your plants for air flow and always plant in a sunny location. Areas where the ground routinely freezes and thaws throughout the winter will benefit from a layer of mulch applied after the ground initially freezes. Also protect your lavender plants from harsh winter winds. Planting next to a stone or brick wall will provide additional heat and protection.
Pruning Although lavender plants get regularly pruned simply by harvesting the flowers, to keep them well shaped and to encourage new growth, a bit of spring pruning is in order. The taller varieties can be cut back by approximately one-third their height. Lower growing varieties can either be pruned back by a couple of inches or cut down to new growth. If you live in an area where lavender suffers some winter die-back, don't even think about pruning your plants until you see some new green growth at the base of the plant. If you disturb the plants too soon in the season, they give up trying.
Containers You can always grow your lavender in pots and move it to follow the sun or even bring it indoors for the winter. Keep in mind that although lavender has a large, spreading root system, it prefers growing in a tight spot. A pot that can accommodate the rootball with a couple of inches to spare would be a good choice. Too large a pot will only encourage excessive dampness.
Insure that the pot has plenty of drainage. To prevent water pooling in the pot, place about an inch of loose gravel at the bottom. Rot root is one of the few problems experienced by lavender plants. Use a loose, soilless mix for planting and remember that container grown lavender will require more water than garden grown plants. How much more depends on the environment and the type of pot. Water when the soil, not the plant, appears dry and water at the base of the plant to limit dampness on the foliage. Compact varieties make the best choices for containers. Some to try are L. angustifolia ‘Nana Alba’ and Spanish lavender (L. stoechas subsp. pedunculata)
How will you use this lovely lavender you'll be growing?

Besides being beautiful and aromatic, lavender flowers are also edible. They can be used raw in salads, added to soups and stews, used as a seasoning, baked into cookies and brewed into tea.
Unfortunately even if you do everything right and your lavender plants appear happy, the genus is generally not long lived and most lavender plants begin to decline after about 10 years. So keep starting new plants to carry you through your rough spots.
Recommended Varieties Lavandula angustifolia (English Lavender) Zones 5-8 'Munstead' An old-fashioned standard with blue-purple flowers. 18" tall
'Hidcote' is favored for its dark purple flowers. 24" tall
'Jean Davis' produces pale pink flower spikes. 18" tall
L. x intermedia Zones 5-8 'Provence' dries particularly well. 30" tall
'Grosso' is highly disease resistant and fragrant. 30" tall
L. dentata (Fringed Lavender) Zones 8-9 This is a bushy, spreading shrub that produces dense purple-blue flower spikes that are very pretty, but only mildly fragrant. 3' tall
L. stoechas (French Lavender) Zones 8-9 A beautiful Mediterranean native that is compact and bushy with fragrant, dark purple flowers topped by a feathery purple bract. Good cultivars include: ‘Dark Eyes’ and ‘Silver Frost’.
L. stoechas subsp. pedunculata (Spanish Lavender) Zones 9-10 Bears its flower stalks high above the foliage.

sourced from:


everything-lavender.com

Hops


The best way to start growing your own hops is by transplanting hop rhizomes (or cuttings) in the spring when they can be shipped and stored well. We recommend planting at least 2 rhizomes. Commercially, growers will plant up to 5 rhizomes per hill. Hops can be grown at almost anywhere or in any type of soil; however, they fair better in rich alluvial or sandy loom soil. They are very hardy plants but the hill they are planted in needs to be well cultivated to encourage proper drainage. They need plenty of water and food that will allow them to grow up to 1' per day, although not typically the first year. Plant the rhizomes were they will receive plenty of summer sun. They can tolerate temperatures in the 100's and below freezing. Hops can tolerate elevations up to 7000'; however, elevations below 3000' encourage more vigorous growth. Hops will grow to 20' in length during the first year. Therefore, plant the rhizomes with a plan for trellising your hops, much like a grape vine possibly. Lay your hills out at least 7' feet apart. Hops shoots can be trained to grow along guide wires, fences, heavy twine and a number of other elevating ideas; but elevate them so they will be easier to harvest. 1) Refrigerate your rhizomes until the soil is ready for planting. 2) Choose a southern exposure, if possible. An east or west exposure is acceptable but the hops will not grow as vigorously. 3) Hops prefer light textured, well drained soil with a pH of 6.0-8.0. If drainage is a problem, cultivate a mound for the planting. Definitely incorporate some organic matter such as manue or grass clippings into the soil, this is also a good time to add some slow release fertilizer such as cottonseed meal, bone meal, rock phosphate, oyster shell, etc. 4) Soak the rhizomes in warm water (approximately 80 degrees) for 1 hour prior to planting. Powdered root stimulates added to the water for soaking of the rhizomes and used during the planting process will bring the shouts out of the ground quicker. 5) Plant the rhizomes vertically with the buds pointing up or horizontally about 2 inches below the soil level. 6) Plant mixed varieties at least 5 feet apart. Identical varieties can be planted 3 feet apart. 7) First year hops have a minimal root system, therefore the soil should not be allowed to dry completely. Mulching the soil surface with some form of organic matter does wonders in conserving moisture as well as controlling weeds. 8) When the vines are about one foot long, select 2-3 strong vines and wrap them clockwise around a support system. This can either be a trellis, or simply a tall pole or strong twine coming down the side of your house. In future years, the earliest shoots should be pruned off in favor of training up the hardy second growth. After the main vines have been established, all subsequent vines should be removed from around the base of the hop. Always use strong twine because the vine can become quite heavy. Secure the taut twine to a stake at the have of the mound.


sourced from:


www.coloradoorganichops.com

Garlic


Why Grow GarlicGarlic was originally a native plant of many thousands of years ago. Evidence of it has been found in caves inhabited more than 10,000 years ago.

Medicinal prescriptions were found chiseled into a clay Sumerian tablet that was more than 3,000 years old. Garlic is a key ingredient to a wide variety of recipes, and is quickly becoming regarded as a natural method to prevent heart disease and cancer - it is after all the second oldest medicine in the world.


Growing garlic is well-suited to both the first time gardener and the more experienced - given the correct soil and planting time, common garlic is relatively maintenance free, yet some of the more unusual varieties provide a challenge.


Where To Grow GarlicGrow your garlic in full sun - garlic needs to grow quickly in order to produce good sized bulbs. Pick a site that is not prone to water-logging, this will ensure the bulbs do not rot over winter.


Garlic can be planted in raised beds and they will grow very well. Click here to go to our page on raised beds.


Plant GarlicThe secret to growing garlic is to plant it in mid October - spring planting is possible in warmer areas, but even then, better sized bulbs will result from an autumn sowing. Dig the soil well to a spade's depth before planting, incorporating as much organic matter as possible to assist with drainage - garlic will rot in water-logged conditions. If you can purchase and dig in some sand (from your garden centre) at this stage, the drainage will be improved even further. A couple of handfuls of bonemeal should also be incorporated every square metre (yard).


Garlic bulbs for planting in Spring need not be bought from a nursery - simply choose the largest ones possible from your greengrocer or supermarket. If planting in mid October, choose a hardier variety such as 'White Pearl', these need to bought from your local garden centre. Each bulb will consist of up to 20 individual cloves, and it is these cloves which are to be individually planted. Gently remove the outer skin from the bulb (not the cloves) and separate into individual cloves - see the picture on the left. On the right is a garlic clove and on the left is the bulb. Select the largest eight or so of the cloves which will be on the outside of the bulb.
Plant each of the cloves in an upright position 2cm (1in) below the soil surface. Looking at the clove in the picture to the right, the bottom blunt end of the clove should be lowest in the ground with the pointed end just below the soil surface.


Space each clove about 10cm (4in) apart. If you are planting rows, space each row 45cm (18in) apart.


Care of Garlic
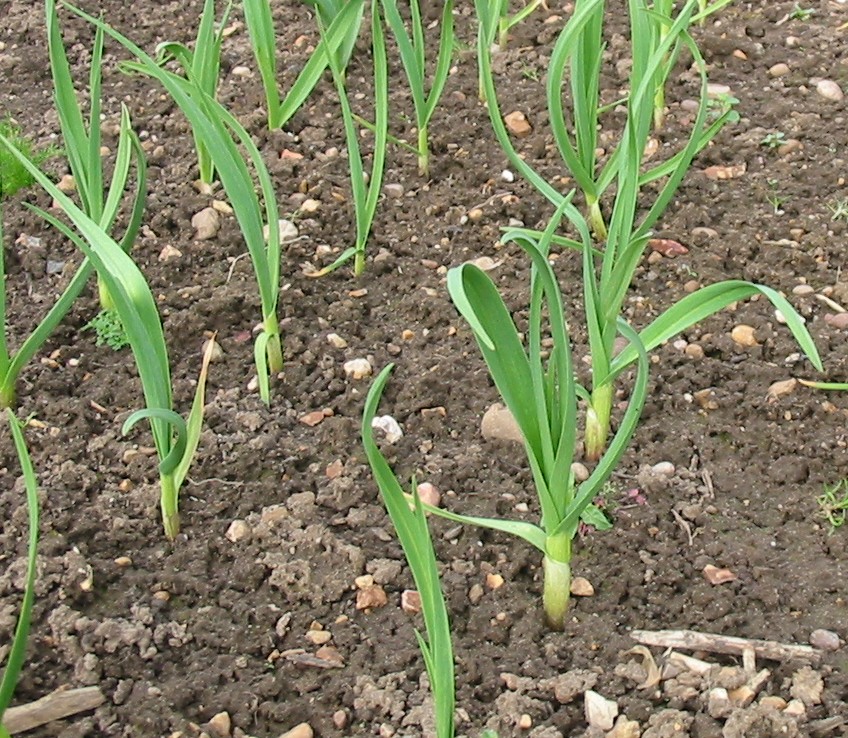
Garlic thrives on a well fed soil at the correct time, so in late March and again in mid May, feed the soil with general purpose fertiliser such as Growmore. If you can do this once or twice a month, so much the better. Apart from this, their only other requirement is to keep them free of weeds and in dry conditions water them. They will produce green foliage starting around April time.

Harvest GarlicGarlic is normally ready for harvesting when most of the foliage has turned yellowy-brown - this will be around mid August time. The problem with harvesting garlic is knowing when they are ripe - harvest too early and the bulbs will be small, harvest too late and the bulb will have split making harvest difficult and the cloves of low quality (they will have commence their growing cycle for next year).


Problems will occur mainly in wet summers - the leaves may only have started to turn yellow but if the garlic is left in wet ground at this stage, the bulbs will very quickly become diseased. For this reason a second method is needed to determine what stage they have reached. If the weather is wet in early August, pull up one bulb and see how many sheaths (very thin papery layers around the bulb) you can peel off the bulb - if there are only three, harvest the bulbs, if there are four or more, wait another two weeks or until most of the leaves have turned brown.
When harvesting garlic bulbs, gently ease them out of the ground with the assistance of using a trowel to loosen the surrounding soil - be careful not to bruise them with the trowel because they will then not keep for long.


The absolutely best garlic is fresh from the ground (known as wet garlic) - this garlic is sweeter, lees pungent and far more digestible than dried garlic. So make sure you use some cloves as soon as possible. The majority though should be be washed and dried and then placed in a warm dry place in the garden (bring indoors if rain threatens) to dry out - these bulbs should keep in good condition for 3 months or more.

sourced from:


northlogansisters.blogspot.com

Shittake Mushrooms


Step1

Determine the growing season for shitakes in your area. The spores should be planted right around the time of the last spring frost. In the meantime, procure some shitake spores, which can come in the form of plugs, from a local, reputable dealer.


Step2

Obtain logs of hard word, about 3-8 inches in diameter, and no more thabn four feet long. Oak, poplar, sweet gum and some maples are a good choice. Rather than cutting down healthy trees, consider asking around to see if any local trees have already been cut down. No more than three weeks should pass between the time they were cut, and the time they`re planted. By that point, natural rot will have set in.


Step3

Drill small holes, about 5/16th-5/8ths of an inch wide, and an inch or two deep, along the logs, every six inches or so, stopping a few inches from either end, Rotate the log about two inches to one side, and repeat. Continue this process all the way around the cirumference of the log.


Step4

Fill those holes with the plugs of mushroom spores. Alternatively, mix the loose spores with sawdust and use the mixture to plug each hole. Then seal the hole with wax: brush over each hole with a paint brush that has been dipped in pre-melted wax.


Step5

Stack the logs in a shady area that also allows for good air flow on top of each other as you would Lincoln Logs, leaning vertically against each other or a stable surface.


Step6

Wait six months to a year for the spores to mature. At the same time, make sure to keep the logs moist, but not too moist. Water them in the drier months, but cover them with a tarp during rain.


Step7

Harvest in the spring and fall. Although production varies, each foot of log should produce about a pound of mushrooms.
sourced from:


www.hawkin.com

Onions


OnionsEasy to grow with a long storage life, onions are one of the best vegetables for the home gardener.

They have the advantage of being a sensible proposition in both the large and small garden, and can be grown in the same position for several years. With a little planning, they can be available for nearly all year round eating.

The introduction of heat treated onion sets (small onion bulbs pre-started into growth before sale) now means that growing onions is almost fool-proof.

Onions prefer a a sunny position with a rich but light soil, however they will do well in most soils as long as it is firm. For this reason it is best to prepare the soil well in advance of planting - December time is fine for maincrop onions, June is best for Japanese onions. Dig the soil to 45cm (18in) deep, working in any organic matter available - remove any stones in the soil that you come across during the digging. Just before planting, tread the soil down so that it is firm.
Onions are ideal plants for growing in small confined spaces, they particularly thrive in raised beds. For more information click here to go to our page on raised beds.
When To Plant OnionsOnions should be treated differently according to their type. Each is described below.
Maincrop onion seed and sets (small, part grown onion bulbs) should be sown outside starting March. If they are sown under cloche protection, they can be sown four weeks earlier.
Japanese onion seed should be sown outside in mid-August.
Spring (or salad) onion seed should be sown at three week intervals from early April to early June.


sourced from:

www.allotment-diary.co.uk

Gogi Berries


How to Grow Goji BerriesOnce established, goji berries are incredibly easy to grow. They’ll grow in almost any type of soil, and can even thrive in poor soil, as they are used to the mountainous regions in the Himalayas. They are reasonably drought-tolerant, and will even grow in partial shade (though you’ll get more berries from them if you grow them in full sun).

window.google_render_ad();
You can grow them from seed, or buy them as young plants. Buying young plants is far easier, as goji berry seeds are prone to rot in the compost and you’re less likely to get good results. The seedlings also need to be kept in warm conditions for 12 months, so for practical reasons, buying young plants is the more sensible option.
Once they’re a year old, however, they are perfectly winter hardy. Unchecked, they grow into a thick bush that reaches up to three metres tall, with vines that can grow to nearly four metres. If regularly pruned, they will form attractive small bushes that produce more berries as a result.
GrowingWhen your plants first arrive it is likely they will just look like bare twigs with some roots on. Don’t worry, this is normal. If planted straight away and watered well they will grow leaves within two-three weeks. Dig a hole around 50cm deep and wide and place the goji berry plant in it.
Firm the soil around the plant and water well. Leave about 1m between plants and mulch the area around the stems with leafmoluld or garden compost to keep the soil moist and well-nourished. You can even grow the bushes into a goji berry hedge; simply plant them 1m apart in a straight line.
FlowersAfter two years the bushes will start to fruit, and from four years you’ll start to get very heavy yields. In early summer the bushes will produce small, delicate, trumpet-shaped flowers that will be either white or purple. Both coloured flowers can feature on one plant, so they provide visual interest before the berry production begins.
The berries will begin to set in autumn. The ripe fruit are sweet and juicy and almost shiny in appearance. The flowers will continue to bloom right up until the first frosts, however, so your plants will be red, white and purple throughout late summer and autumn.
They are beautiful to have in your garden, delicious, nutritious, and cheap and easy to grow. If you want health-boosting berries on tap you should consider investing in a goji berry bush or two.


They’re the latest ‘must have’ miracle berry in celebrity circles. Said to banish cellulite, boost your immune system, contain more vitamin C than oranges and more iron than steak, this Himalayan berry is quite a catch. There’s one problem though, they’re very expensive to buy. Good news then, that these little red berries can be grown in the UK’s climate easily, and you can eat piles of fresh goji berries throughout the summer months from just a few, small bushes.
Growing your own goji berries is not only kinder to your wallet; it’s kinder to the environment too. They are now commercially grown in China, Mongolia and Tibet. The food miles involved in shipping them over to health shops in the UK are quite substantial, so if you have room for a bush or two in your garden or on your balcony, they’ll be a wealth of benefits involved.


sourced from:


hamannfamily.blogspot.com
 
http://www.wanae.com/dropski
Wanae.com Free Online Art Gallery - 08-12-09
© Wanae.com Free Online Art Gallery